Multimedia platform streaming guide
Heya! In the spaces I hang out, this topic comes up on a regular basis, so I’m putting together this guide for reference. It’s meant to help you understand how to put together a streaming setup. This should work for pretty much anything that takes a camera/microphone as an input, including, but not limited to applications like Skype or Discord, but also any video game or webrtc application like gikopoi. With a bit of an adaptation you can also make it work for fully dedicated streaming platforms like youtube, twitch, kick, rumble, odyssey, etc.
While for dedicated platforms, OBS can handle pretty much everything, for everything else it’s a bit more involved. The reason is because we will have to separately handle sound and video. I will try to cover each platform for a possible setup.
The TL;DR of everything is that you want to create a virtual camera and a virtual microphone and use them as sources.
Windows
For Windows, things are pretty straightforward since there aren’t many options. I’m not a Windows user, so some screenshots are stolen from the internet from other guides.
Video
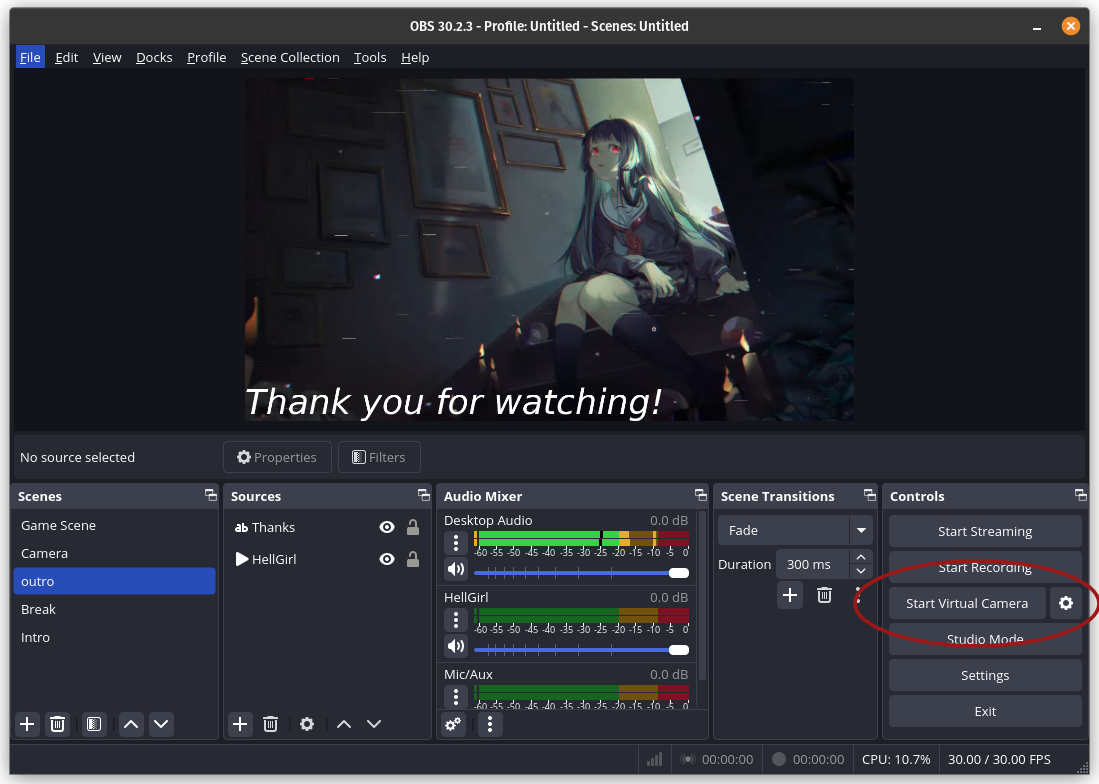
For video, we can use OBS. After you compose your scenes and make sure they look good, you will want to hit the Start Camera button. That’s your video source!
Audio
For audio is where I see people struggle the most with, since there are several options.
Stereo Mix / What U Hear
It goes by either name, and its availability is sound card dependent. I know in RealTek chips it’s called Stereo Mix but for other sound cards I’ve seen it called What U Hear.
It’s often disabled by default and hidden, so we have to enable it first.
For that, you want to go intro sound settings from the control panel.
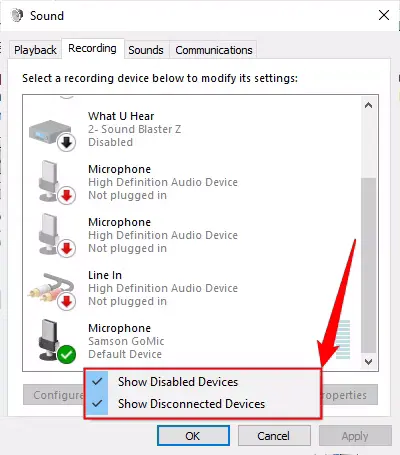
Afterwards, simply enable it.
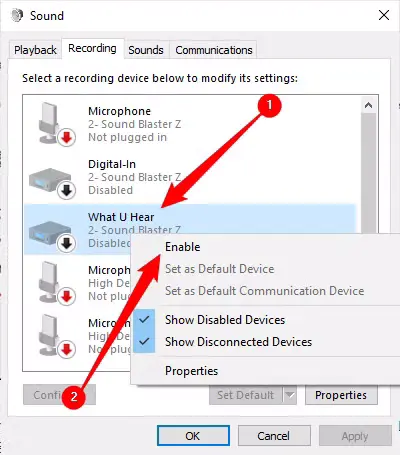
The name is quite unclear, but I cannot stress enough that this is a loopback interface.
What does this mean?
It means that the sound has to actually go trough it. So if you have multiple sound cards, but the one you actually use doesn’t have a loopback interface, then your audience won’t hear anything.
When you finally start your stream, make sure you select it as a sound source.
While this approach is fairly straightforward, the downside is that people will be able to hear everything coming from your PC, including notifications, errors, etc.
If you decide to use a microphone as well, you will also hear your own voice. All the time.
Voicemeeter
This option provides a lot more granularity in what your audience will hear, the downside is that the setup is a bit more involved.
First things first, you will have to download the software.
They also offer fairly extensive documentation with their user manual. I encourage you to consult it if you are curious about anything.
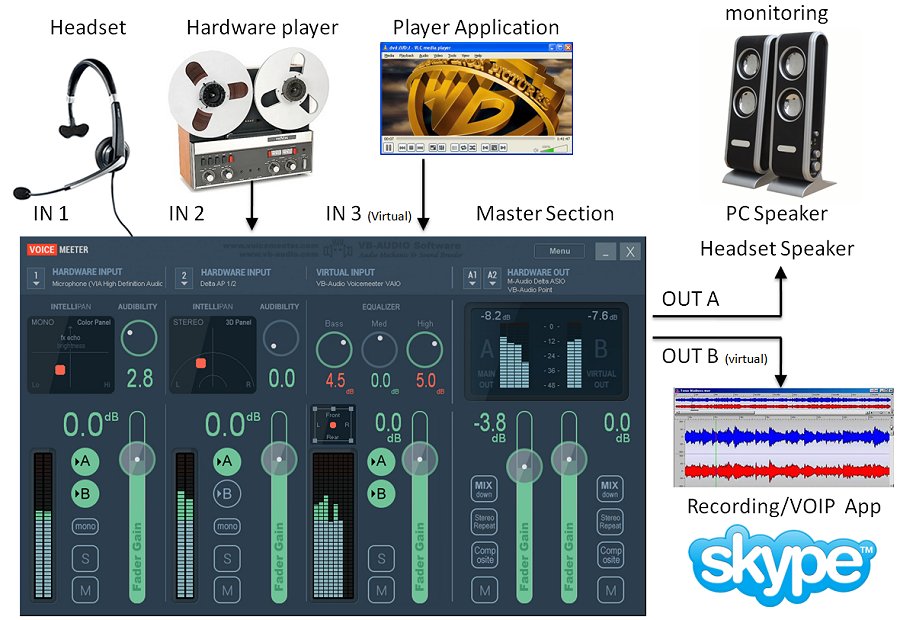
The interface looks pretty intimidating, but it’s quite straightforward once you get used to it.
Hardware inputs are physical recording hardware, like a microphone, musical instruments, etc.
A virtual input is basically a virtual microphone, or in other words, a “microphone” for your software.
Voicemeeter, by default, has two virtual outputs. One of them is going to go to your hardware, and the other is a virtual output.
As far as the interface goes :
- You have your volume sliders which you can adjust the volumes.
- A is loopback, which will bounce the sound back to you (you want this for software). Useful for testing your microphone and hearing your own software too!
- B is for bouncing, which will redirect the sound to the virtual output. This is what your audience will hear.
- SOLO is for isolating a line, useful for debugging.
- MONO will duplicate any mono sound sources to stereo, useful for microphones and musical instruments.
We’re not done yet. Next, we will have to redirect our applications to the Voicemeeter virtual input.
You can use the Windows audio mixer for this.
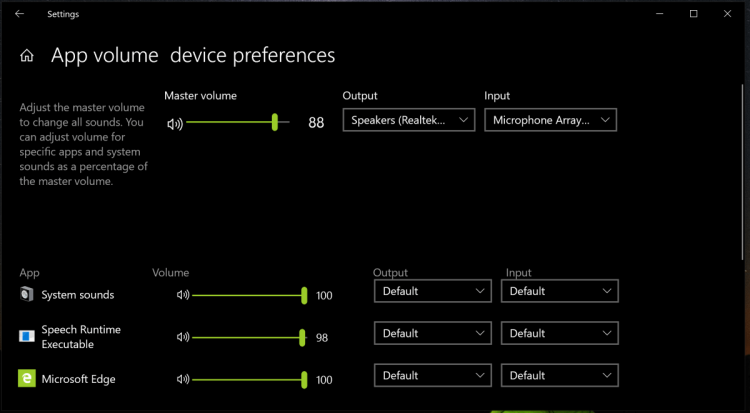
Simply browse that list for the applications you are interested in having your audience hear, then select the output and pick the voicemeeter input.
Conclusions
And that’s a wrap! When I used Windows, I prefered the voicemeeter and OBS setup.
When you start your call/stream/whatever, make sure you select the OBS virtual camera as a video source and the voicemeeter virtual input as your microphone and you’re good to go!
Linux
On Linux, things work a bit differently from Windows, but the basic principle remains the same - we need to set up virtual devices for both video and audio. Let’s break it down:
Video
Just like on Windows, OBS is our go-to solution for video. The setup is practically identical:
- Install OBS from your distribution’s package manager
- Set up your scenes and sources
- Click “Start Virtual Camera”
The virtual camera will then be available to any application that can use v4l2 devices (which is pretty much everything).
Audio
For audio routing on Linux, we have a few options, but I’ll focus on the most flexible and modern approach using PipeWire and qpwgraph.
PipeWire + qpwgraph
PipeWire has become the de facto standard for audio on modern Linux distributions, offering powerful audio routing capabilities. qpwgraph provides a nice visual interface for managing these connections.
First, make sure you have both installed:
# On Ubuntu/Debian
sudo apt install pipewire qpwgraph

# On Fedora
sudo dnf install pipewire qpwgraph

# On Arch
sudo pacman -S pipewire qpwgraph
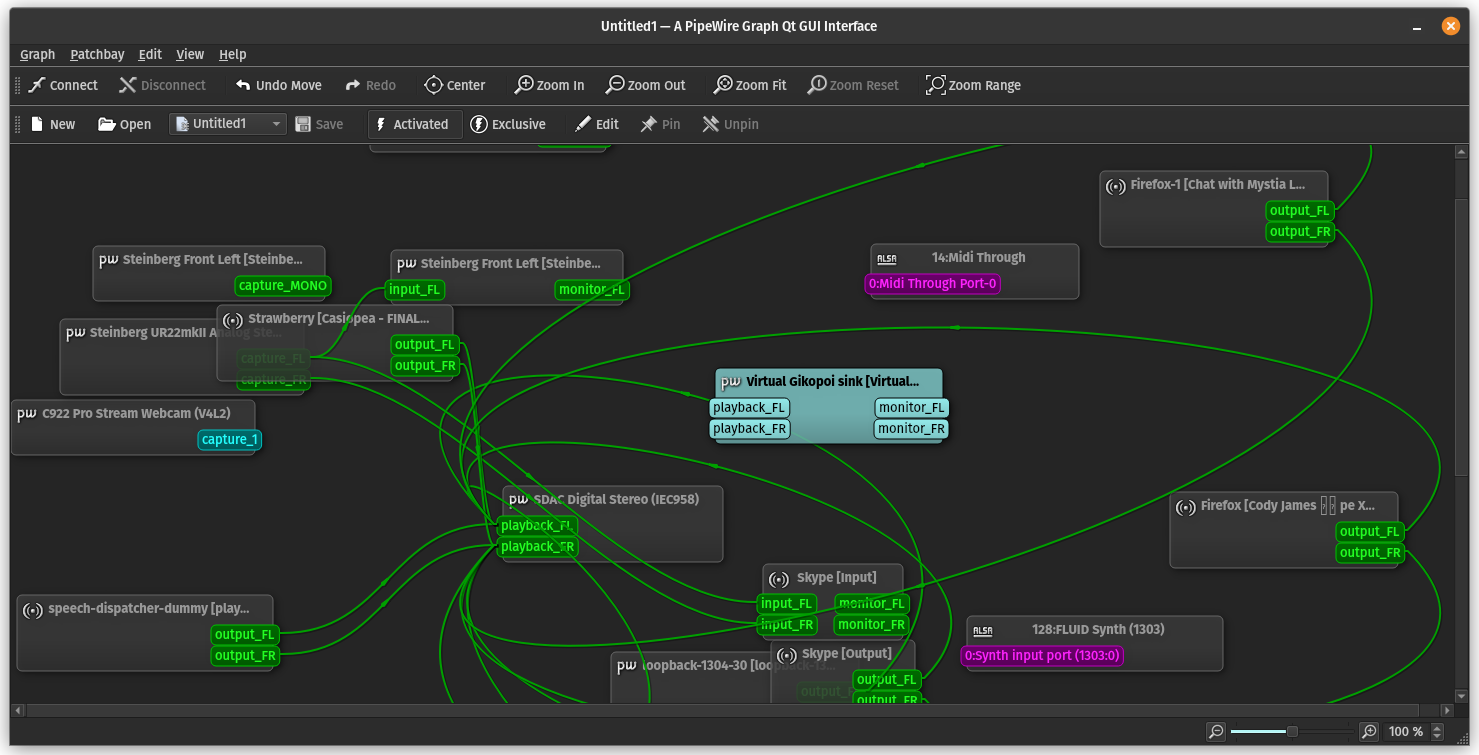
Once installed, launch qpwgraph. You’ll see something that might look intimidating at first, but it’s actually quite intuitive:
- Left side: Audio sources (outputs from applications, microphones)
- Right side: Audio sinks (speakers, virtual devices)
- Lines between them: Active connections
To create a virtual device for streaming:
- Load the null-audio module if it’s not already loaded:
pactl load-module module-null-sink sink_name=Stream -
In qpwgraph, you’ll see your new “Stream” sink appear (in my screenshot I named it Gikopoi Virtual Sink, but it’s the same)
- You can then:
- Connect your microphone to the Stream sink
- Connect specific application outputs to the Stream sink
- Connect the Stream sink to your headphones so you can monitor
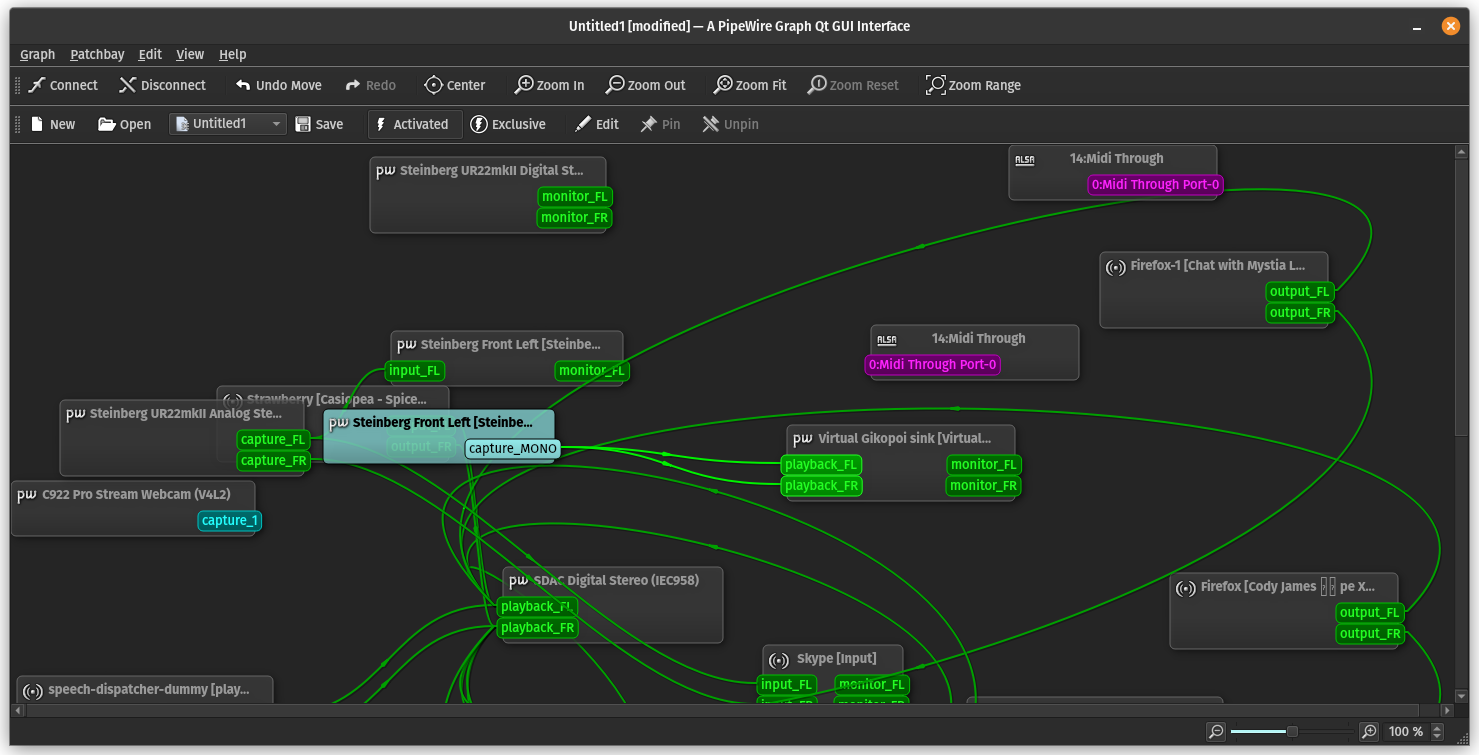
The “Stream” sink will appear as an input device in your streaming applications.
Alternative: PulseAudio Volume Control (pavucontrol)
If you prefer a simpler approach, pavucontrol can handle basic audio routing:
- Install pavucontrol:
sudo apt install pavucontrol # or equivalent for your distro - Create a null sink:
pactl load-module module-null-sink sink_name=Stream - Use pavucontrol to route audio to your virtual sink

The downside is that you don’t get the visual representation of connections that qpwgraph provides.
Conclusions
While the Linux setup might seem more complex at first, it actually offers more flexibility than the Windows solution. Once you get comfortable with PipeWire and qpwgraph, you can create some really sophisticated audio routing setups.
Remember to save your routing configuration in qpwgraph so you don’t have to recreate it every time!
macOS
macOS users have several excellent options for both video and audio routing. Let’s explore them:
Video
OBS Virtual Camera
Just like on Windows and Linux, OBS works great on macOS. The setup is identical:
- Install OBS from their website or using Homebrew:
brew install obs - Set up your scenes
- Start the virtual camera
Alternative: mmhmm
mmhmm is a macOS-native alternative that’s particularly good for presentations and streams where you want to appear alongside your content. While it’s not free, it offers some unique features that OBS doesn’t have.
Audio
BlackHole
BlackHole is the go-to solution for audio routing on macOS. It’s open source and works similarly to Voicemeeter on Windows.
- Install BlackHole:
brew install blackhole-2ch - Create a Multi-Output Device in Audio MIDI Setup:
- Open Audio MIDI Setup (from Applications/Utilities)
- Click the + button and choose “Create Multi-Output Device”
- Check both your speakers and BlackHole
- Make BlackHole the first device in the list
- Set BlackHole as your audio output in the application you want to stream
Alternative: Loopback
Rogue Amoeba’s Loopback is a premium alternative that offers a more user-friendly interface and additional features. It’s particularly good if you need to:
- Create multiple virtual devices
- Mix audio from different sources
- Apply effects to your audio
Tips for macOS Users
- If you’re using a newer Mac with Apple Silicon, make sure to get the native ARM versions of these applications for better performance
- The built-in mic on Macs is surprisingly good, but if you’re serious about streaming, consider an external USB microphone
- MacOS’s built-in audio interface is quite good at handling multiple audio devices, so you can create sophisticated setups without worrying about latency issues
Conclusions
macOS offers a good balance between the simplicity of Windows and the flexibility of Linux. While some of the premium tools can be expensive, the free options like OBS and BlackHole are more than capable of handling most streaming needs.
Remember to always test your setup before going live - nothing’s worse than starting a stream only to find out your audience can’t hear your awesome background music!